Saturday, November 27, 2010
Chapter 21 Project 21-3 & Take apart a notebook in class.
1. What is the brand, model, and serial number of the notebook?
I brought my own laptop to school to take apart. It is a Compaq Presario 2100 S/N TW30227226. * As a side note this was not for use in the states was made for use in Singapore so the Sn doesn't show up for anything on the HP use site.
2. What is the website of the notebook manufacture?
http://welcome.hp.com

Direct link too the notebooks service site. Compaq Presario 2100
3. If the website provides a service manual download the manual and print a few pages.
Yes I was able to find the service manual online. For a link click Service manual Presario 2100


 In class project taking apart a laptop.
 Our teacher Brad had a laptop he was taking apart to show the class. I asked him if I could take bring in my old laptop to take apart and he said sure. So below I will video log my disassemble of my Compaq Presario 2100. Since I forgot to take photos while I had it in class.
Proof the old thing works.
 The video.
Chapter 20 Projects 20-2, 20-3, 20-4.
I've used AVG for a free years now but I had a heck of a time with this project. I was unable to install AVG because on install it said it I had to delete Zone Alarm first. When I deleted Zone alarm I ended with an error and upon reboot found my internet connection drives messed up. so I was unable to hook up to the internet. A system restore to earlier in the same day worked, but took some time. After I got that sorted I was able to install AVG. The first scan took over an hour. My scan did not find any virus not surprised because this is a fresh install. A scan is something best done over night.

Project 20-3
This project is to research 10 running processes.
explorer.exe: Windows OS file runs and has a graphical user interface so that you can see when you are opening hard drives or files.
avgui.exe: part of the AVG anti-virus.
taskmgr.exe: file used to launch Windows Task Manager
jusched.exe: process installed alongside Sun Microsystem's Java suite and checks for Java updates.
winlogon.exe: process belonging to the Windows login manager.
ForceField.exe:
belongs to ZoneAlarm.dww.exe: Desktop Window Manager is the compositing window manager that gives you all those pretty effects in Windows
csrss.exe:The Microsoft Client Server Runtime Server subsystem utilizes this process for managing the majority of the graphical instruction sets under the Microsoft Windows operating system.
taskhost.exe: Is a generic windows process used to load other entities.
 Project 20-4
 Autoruns start up list is way more vast then msconfig. Plus it lists the start up process in a easy to know what they are categorizes.

Chapter 19 Projects 19-3, 19-4, Real Problem 19-2
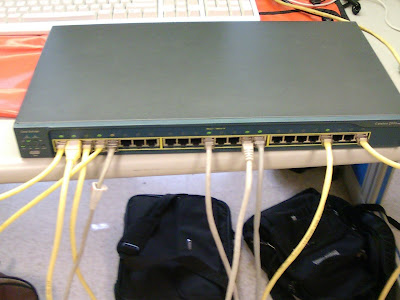
For this project we had to all hook up to the switch again (see photo below) and set our IP address just like the last blog. Before we unplugged from the school's network we had to download & install a port scanner called "Advanced Port Scanner" from Framatech at www.radmin.com.
 The port scanner was kinda neat I can see how this tool would be very useful on a huge network to track down any vulnerabilities.
He is a scan after Bob started an FTP server.

Project 19-4
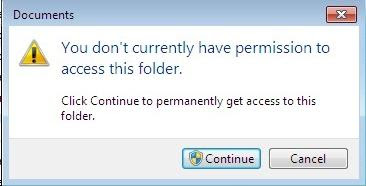
In this project I had to make a new account with out administrator privileges. I was very limited with this account, I kept getting the recurring error message you can see in the photo below when ever I tired to access the document fold of the administrator account, install a program or when I tried to make another account on the OS.

In this project I had to research the three password recovery utilities listed below.
Ophcrack by phpBB Group
Approach-based on rainbow tables
Cost-free
Drawback- Not sure how to use, heard it could take days to get password.
Active Password Changer
Approach-Uses a boot-able Cd that then back doors the OS installed on the hard drive. Finds the folder where the system passwords are then it changes the encrypted passwords.
Cost-$49.99
Drawback- none, other then it cost money.
Window Password Reset
Approach-Uses a boot-able Cd or a flash drive (depends on what version) that then back doors the OS installed on the hard drive. Finds the folder where the system passwords are then it changes the encrypted passwords.
Cost- Standard $19.95, Professional $29.95, Enterprise $49.95
Drawback- Not a big deal but need a 2nd PC to download and make the boot able CD or flash drive.
The one I would pick to purchase would be Window Password reset. I choose this one because they had 3 affordable programs that lets me chose what level I need. If I wanted to get into a home version of window I would get the Standard. But if I need to get into my server then Enterprise would be the way to go. To be honest the cost was the main reason for my decision.
Chapter 18 Setting up a networks.
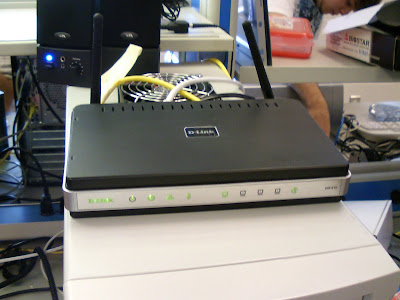
In this blog we had to set up two Networks in class. One with a switch between everyone & one with our lab partner using a Wireless D-link DIR 615 router.
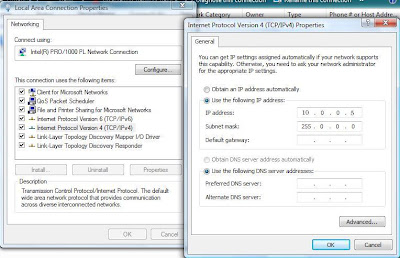
 Next we had to set our own IP address so there would be no IP conflicts on the class room network. To set your IP address in windows 7 go to control panel /Network and Internet/Network and sharing Center. The on the left click "Change adapter settings" then right click on the Connection you want to set. (mine was Local Area Connection) Go to Properties. On the Networking Tab select internet Protocol Version 6 then hit the Properties button. Now you will get a window that looks a lot like the one below this is where you can set your IP address.
I was able to get in most people's PC the biggest problem for some was windows fire wall. Once we turned that off most people could then see each others file. (If they had Zone alarm they could just set the network IP range as a trusted zone) Of coarse Just like in Net-125 no one could get into my PC even with my firewall off. I think the problem ended up being that I had password protected sharing on.
For this lab we had to hook up to a D-link DIR-615 wireless router with our lab partners. My lab partner was Brian King. Since these router were used for other labs by other people the password was unknown. The router's IP address would have been easy to get with a simple command ipconfig/all. But I decided to wipe the router before we even tried to hook up to it. This way the router has a default password and IP address. To reset the router use a paper clip, insert it in the hole, in the back of the router and push the button and hold for 5 secs.
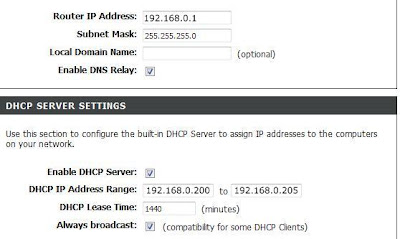
Now with the router reset I was able to guild Brian to the router's settings (You use a internet browser, with the router's IP address, in the address line.) Once we got into the settings we set up the Router's IP address (class C),we just used the default IP since the Class A (10.0.0.1) that we were going to use conflicted with the school's network) We did, however set the IP address range to limit the number of PC on this network to 5. So our range was 192.168.0.200 ~ 192.168.0.205. AS seen by the photo below. Next step would have been to set the wireless security but we just talked about it since we didn't have any wireless device to hook into the router. That would have been setting a WPA2 and or MAC filtering. *Note: If you ever set up one of these little wireless router for home use please set your router's password. To often I see just plug these thing and let'em go. If you do that its too easy to look up the default password, and then anyone can get into your router and change your settings.
Chapter 17 Project 17-1 &17-3.
Project 14-1
1. What is the hardware device used to make the connection (network card, onboard port, wireless)? List the device’s name as Windows sees it.
The hardware device to connect to the net is a onboard NIC. Windows sees it as “VIA Rhine II Fast Ethernet Adapter”
2. If you are connected to a LAN, what is the MAC address of the NIC? Print the screen that shows the address.
The MAC address is 00-30-67-57-6B-A6
3. What is the IP address of your PC?
The IP address is 10.20.200.93
I used one utility to answer all three questions and that was the command ipconfig/all.

Project 14-3
1. Find threes switches by different manufacturers that support Gigabit Ethernet and have at least five ports.
· D-Link DGS-2208 10/100/1000Mbps 8-Port Desktop Green Ethernet Switch $39.88
· NETGEAR GS108 10/100/1000Mbps Gigabit Ethernet Desktop Switch $59.99
· TRENDnet TEG-S80G 10/100/1000Mbps GREENnet Switch $24.99
2. Compare the features and prices of the three switches. Which switch would you recommend for a small business network? What information might you want to know before you make your recommendation?
I would recommend the D-Link DGS-2208. The information I wanted to know before making a recommendation are:
Brand name- is it well known with good support. In other words do they have a good name?
Warranty- what kind of warranty does the product have? How long and what does it cover?
Spec- Does it do what it needs to do?
Price- Is the price comparable to other similar devices? If not why?
I recommend the D-Link because it is a well known brand with a good reputation. It has a limited Lifetime warranty. It supports eight Rj-45 10/10/1000 ports, an 8k MAC address Table, supports green technology thus uses less energy and runs cooler. The price is near other such products and with-in budget of a small office.
3. Find three network adapters by different manufacturers to install in the desktop computer that supports Gigabit Ethernet.
· Rosewill RC-411 10/ 100/ 1000Mbps PCI-Express Network Adapter 1 x RJ45 $14.99
· Intel EXPI9301CT 10/ 100/ 1000Mbps PCI-Express Gigabit CT Desktop Adapter 1 x RJ45 $36.99
· RENDnet TEG-ECTX 10/ 100/ 1000Mbps PCI-Express $48.86
4. Compare the features of the three network adapters. Which one would you recommend and why?
Based on warranty and Price I would recommend the Rosewill RC-411.
5. What is the total price of the upgrade, including one switch and four network adapters?
See photo below for price.

Chapter 16 Project 16-1 & 16-4.
Project 16-1
The System File Checker tool can be used to find and replace corrupted Vista system files. The tool keeps a log of its actions, and, if it cannot replace a corrupted file, you can find that information in the log file. Than you can manually replace the file. Locate the Microsoft Knowledge Base Article 929833 at the support.microsoft.com site. Do whatever research is necessary to understand the steps in the article to manually replace a corrupted file and answer these questions:
1. What are the other parameters for the sfc command besides /scannow?
findstr /C:"[SR] Cannot repair member file" %windir%\logs\cbs\cbs.log >sfcdetails.txt
2. Explain the purpose of the findstr command when finding the log file.
The purpose of findstr is to look for patterns of text in files using regular expressions.
3. Can a filename other then sfcetails.txt be used in the findstr command line? Explain your answer.
Yes other files can be searched for using findstr. Findstr is capable of finding the exact text you are looking for in any ASCII file.
4. What is the purpose of the edit command?
The edit command allows a user to view, create, and or modify their computer files.
5. Explain the purpose of the takeown command when replacing a system file.
This command enables an administrator to recover access to a file that previously was denied, by making the administrator the owner of the file.
6. Explain why the icacls command is needed in the process.
Icacls is needed to modify the Access Control List on the files need to be replaced. In other words lets you control it or have access to it.
7. List some ways that you can locate a known good copy of the corrupted system file.
The installation disk might have the files you need. Another good place would be a healthy system with the proper files.
Project 16-4
I followed all the steps this told me to do and I was unable to change any files. As you can see from the photo below I got a permission error each time I tired to change any of these files. And yes I was log in as the computer administrator. (you can see my log in near the bottom)

Chapter 15 Project 15-3,15-4,15-7.
As you can see from the photo below Startup repair did not find any problem so it didn't do anything.

2.Execute System Restore. What is the most recent restore point?
The most recent restore point was from when I installed open office. *Note: The date was off by a month on my PC. True date was Dec 1 ,2010. See image below.

3. Using the command prompt window, open the Registry Editor. What command did you use?
As you can see from the photo below I used regedit command to open the registry.

4. Using the command prompt window, copy a file from your Documents folder to a flash drive.

Project 15-4

Project 15-7

